Science
Blog Post #1 (January 11th, 2024)
I have been very anxiously looking forward to taking a course on how to teach science since the beginning of this program. Growing up I LOVED learning about human anatomy and physiology which ultimately led me to the profession of nursing. To this day, A&P is my favourite area of study which is why I cannot wait for the day that I have the opportunity to teach it!
Reflecting on my very first science class, one thing stood out to me over the rest. This was doing the activity of writing down words that represent a great science teacher. (See below photos).
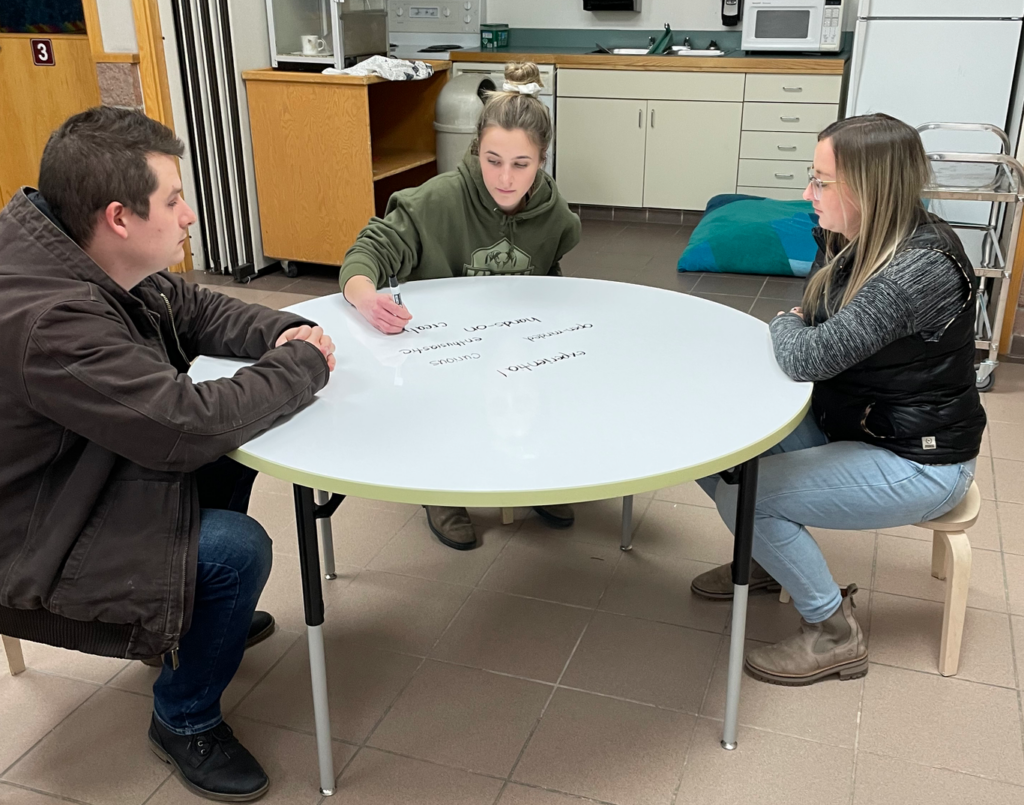
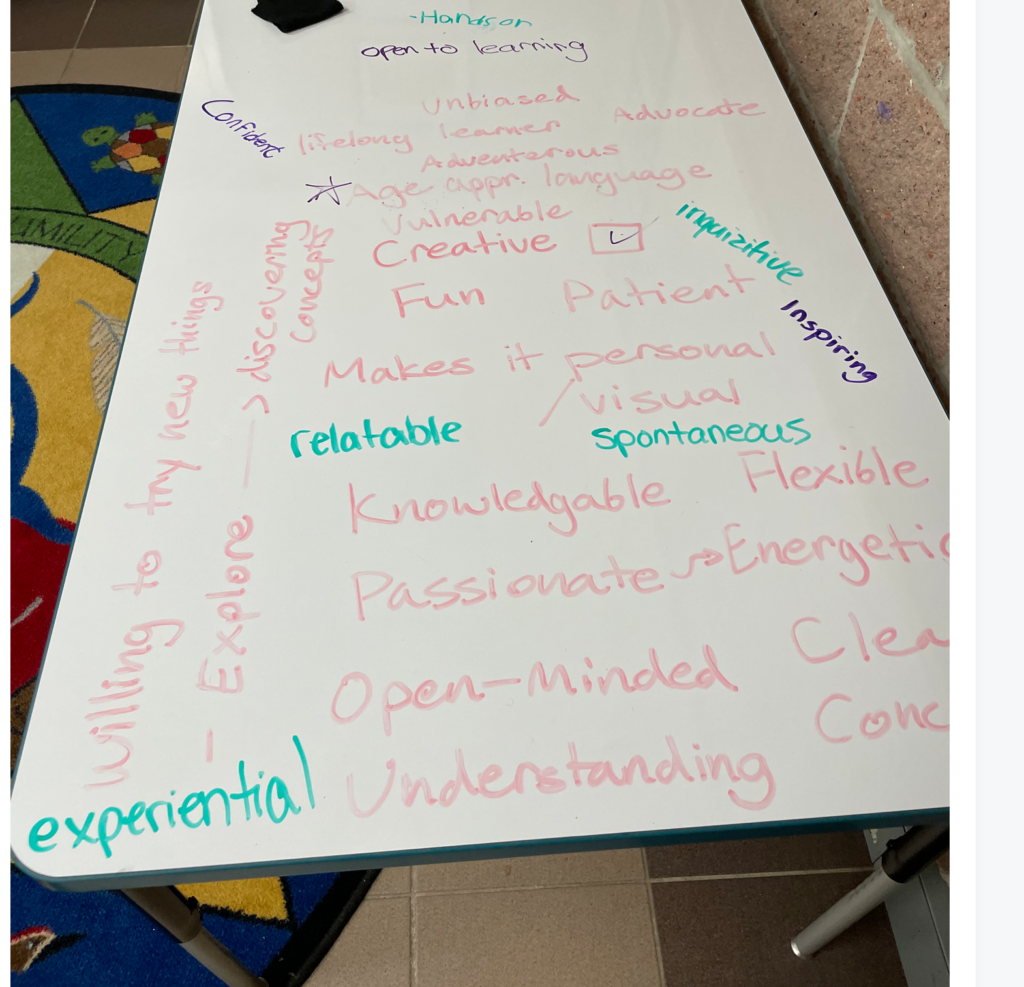
Although it sounds so simple, on reflection, it was a lightbulb moment for me when I was asked the question “Are these words descriptive of only a good science teacher or good teachers in general?”. I was stumped to not find a single word that only reflected a science teacher specifically.
This is why I am very excited to learn the essential skills over the course of this semester to truly become not only a great science teacher but a great teacher across the curriculum.
-Chelsea
Blog post #2 (January 18th, 2024)
This week I had two “aha” moments that stood out to me.

- The chapter: “Mishkos Kenomagwen: The Teaching of Grass” in the book “Braiding Sweetgrass” by Robin Wall Kimmerer stood out to me. This is because it had me thinking of a unit I created with Morgan Tank based around Traditional Ecological Knowledge. There is a quote from this chapter that states “Our research was most definitely grounded in theory- Lena’s, primarily- in the traditional ecological knowledge of Indigenous peoples: If we use a plant respectfully, it will flourish. If we ignore it, it will go away” (Kimmerer, 2013, p. 159). The reason why I wish I had read this book earlier is because I wish I could have brought this into our grade six practicum last year when we were talking about TEK. This book is an invaluable resource. I hope to teach that unit again, and will weave lot’s of this book, especially this chapter, within that unit!
2. The second ‘aha’ moment for me doing the below surface tension demo!

A: I genuinely had SO much fun doing this activity today! I will write the instructions below so I can use this in my future classes one day!
B: Steps of demonstration:
- Gather supplies: 4 water cups, 4 different colours of food colouring, 4 eye droppers or syringes, a baking sheet, piece of cardboard, and piece of wax paper (per group).
- Have students complete a POE worksheet throughout the demonstration (Predictions, observations, explanation of the science).
- Ask students to predict what is going to happen (P)
- Ask students to observe what happens when you place a drop on the wax paper. Try moving the drop around, how fast can you move it?, can you mix the colours?… Allow students to record their observations (O).
- Explain the science behind this experiment. Share with students what surface tension is.
- Connect the demonstration to a real-life application: Tie this to TEK with the connection to water striders.
- Allow students time to experiment with this project themselves.
A reason why I appreciated this demonstration was the cross-curricular connections that are possible with it. Below are my ideas to do just that:
C: Cross-curricular connections: This demonstration can be used in more than just science! Some cross-curricular ideas we came up with are teaching different colours or in later grades the mixing of colours. In math this would be a great way to teach patterns. It would also be a great lesson to teach water properties!
Tomorrow I get to start planning my demonstration project with Lauren, I can’t wait to share it with you all next week!
-Chelsea
Blog Post #3 (January 25th, 2024)
This week’s class was full of “aha” moments but one stood out over the rest! This was the lesson Inspirations on Local Plants!
Before this class, the only knowledge I had of plants was from my Biology 101 course at the college. This course focused on things such as the Calvin Cycle and plant classifications. This course taught me A LOT about plants; however, I was unsure how to translate this knowledge to younger students while making it engaging. Today that changed with an “aha” moment. I now have wonderful, practical, and fun lesson ideas to do this from our instructor Judi Poole. Best of all, the lesson not only includes a Western science lens but also interweaves Indigenous knowledge, specifically that of Ktunaxa Peoples’. I believe that when we as educators tie Western Science with Traditional Ecological Knowledge we can have a more holistic understanding of our world which will help mold more compassionate, caring, and open-minded students.
Explanation of the lesson
*This Lesson could easily span multiple days*
Curriculum Connections (Grade 3):
Big idea: “Living things are diverse, can be grouped, and interact in their ecosystems” (BC Curriculum, 2024)
Curricular Competency: “Transfer and apply learning to new situations” (BC Curriculum, 2024).
Content: “Biodiversity in the local environment” and “the knowledge of local First Peoples of ecosystems” (BC Curriculum, 2024).
Cross-Curricular Connections: Art (creating your own plant), ELA (Learning the Ktunaxa names of local plants), you could also tie this into social studies by having students do an inquiry project on different local plants to discover their names, uses, where they are found, their “super powers”, and create a diorama to share with the class.
a) Introduce students to the scientific and Western names of local plants (There are Q-Cards available at the SD5 Resource Center). With the cards, have the students play a game of match!
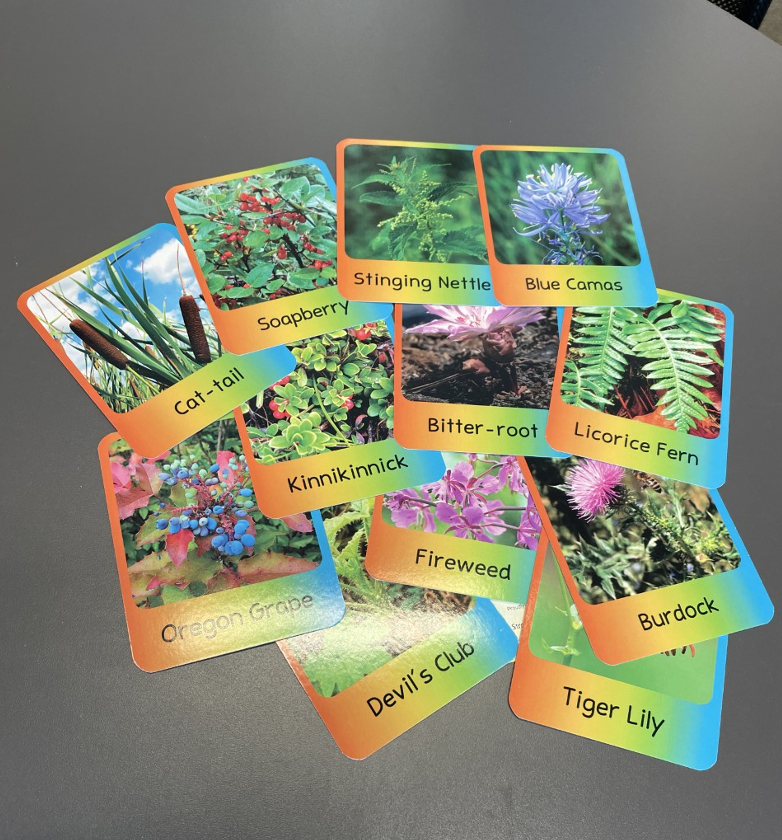
b) Next, share with students Q-Cards (that you create), that show the scientific and Ktunaxa names of the local plants. Have the students practice saying the different names. You could also extend this game by playing memory with the Ktunaxa names.
c) Give students time to practice the Ktunaxa names through the First Voices App (Ensure they are already downloaded on the school iPads if you plan to use them otherwise you can pull them up on your laptop and project them onto the board and practice as a class).
c) Next, introduce students to the meaning of Taxonomy. Taxonomy is “…the science of classifying and naming plants” (Poulsen, 2020).
d) As a final project, allow students to create their own plant, names (Western and scientific), and a make-believe story of how the plant was discovered and what it does. Ideas of materials to bring: felt, tissue paper, egg cartons, buttons, beads, pipe cleaners, yarn, eyeballs, pom-poms, scissors, glue guns, and markers. Tell students they must use one piece of driftwood but the rest of the materials are to be chosen based on their creativity. Please see my below example:
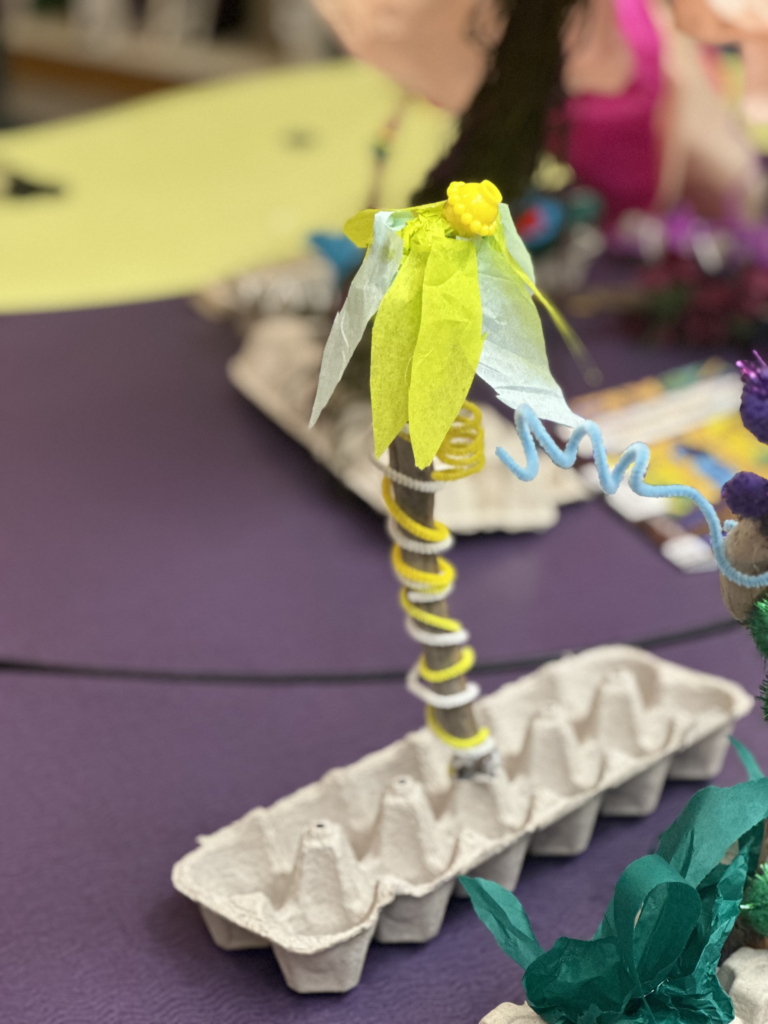
Created by: Miss Blake
Western name: Hawaiian Sisters
Scientific name: Kauaistasis Sisters
Story: I was Trekking along the coast of Kauai, Hawaii, with my sister Penelope. She has diabetes and was starting to show signs of hypoglycemia (low blood sugar). Unfortunately, we were far from town and there were no fruit trees nearby. We came across a local who told us about the Kauaistasis sisters. She said to eat the green flower pedal. To our surprise, her blood glucose level was back to normal. We wondered what would happen if she ate the blue pedal. It did the opposite, dropping her blood sugar level! WOW! So, if you are ever in Kaui and have high or low blood sugar and need to have it regulated (back to homeostasis) this is the plant for you! Just be careful, if you ingest more than one of either pedal this plant can increase or decrease your blood glucose to lethal levels (Created by miss Blake, 2024).
I also promised I would share Lauren and I’s demonstration this week. We created a demonstration to teach students about density! (Grade 6 in the BC Curriculum). This is something I would definitely bring into my future teaching as I think students would be very engaged and have a better understanding of different densities with the visual demonstration.
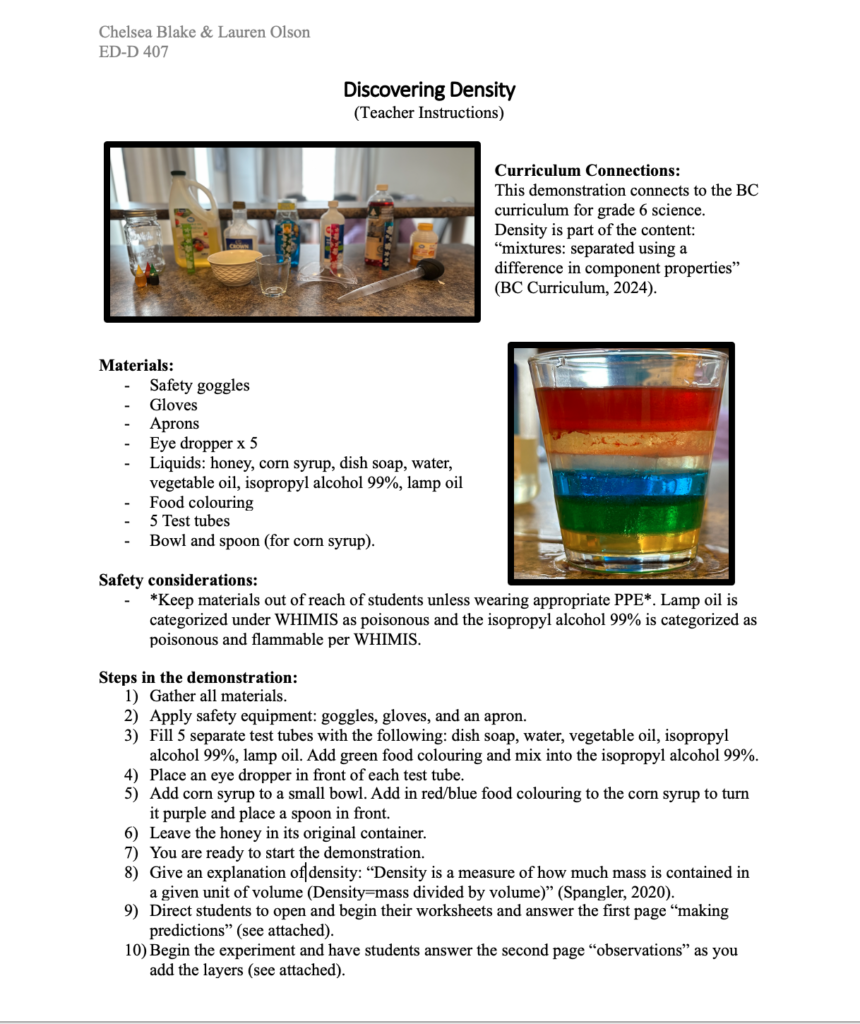
Please find this 3-page teacher instructions on my Google Docs to print and use with the following link: https://docs.google.com/document/d/19N6lj7YpDAsXpb2YGoOoqd7PuG0HfX4iznyKIBl4nqA/edit?usp=sharing
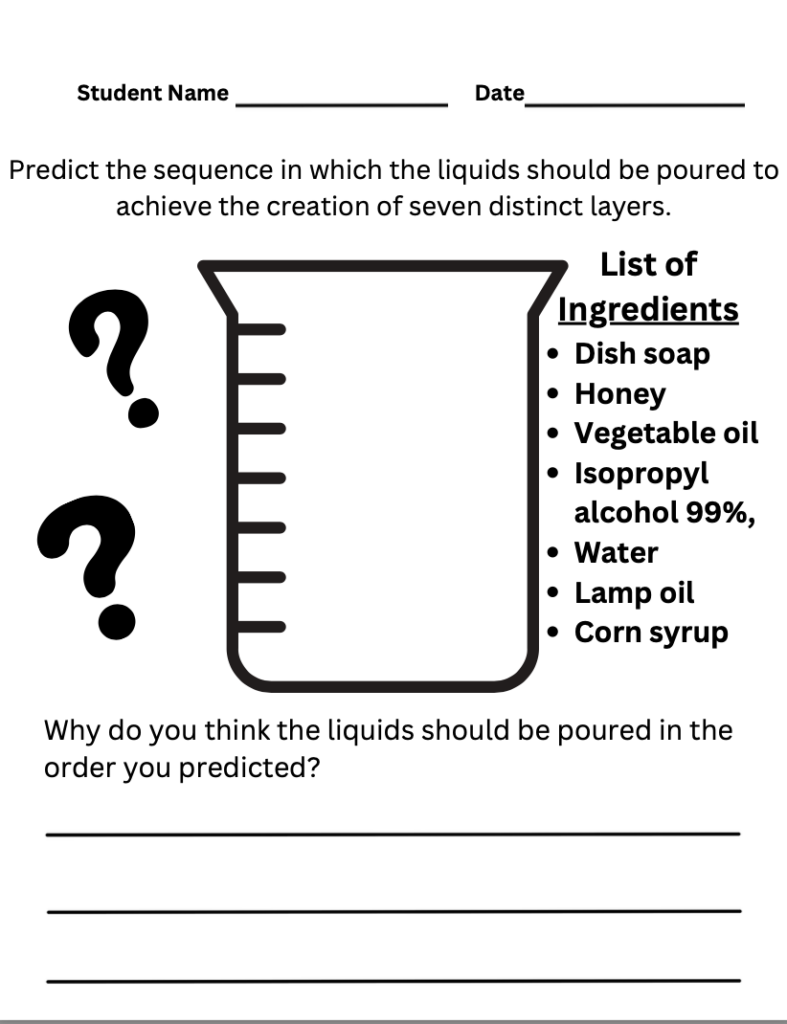
Please find this 4-page student handout on my Google Docs to print and use with the following link: https://docs.google.com/document/d/1-1X8XQieYgZqdyDdClWNkGpsFkMcC4LV7iMIUhLLPog/edit?usp=sharing
I hope you find this demonstration and student handout useful in your classroom one day! I wonder what would happen if you extended this learning further and allowed students to drop objects of different densities in? Which layers would they float to? I also wonder what would happen if you poured the layers in the incorrect order.. would they still turn out to be a beautiful rainbow?!
See you next week!
-Chelsea
Blog Post #4 (February 1st, 2024)
Using books as a springboard to teach science!

My “Aha” moment this week was connecting literature to science! Below are the reason’s why I will ensure to include books in my science lessons no matter the students age:
- They inspire curiosity.
- Allows teachers to integrate learning across the curriculum.
- Books are a great way to build lessons with cross-curricular connections.
- Allows students to tap into previous knowledge and build upon it.
- They provide another way for students to research.
I also have to share that this week I learned that there is a big difference between picture books and information books. The goal of picture books is to educate through entertainment where as information books focus on factual evidence and information. It is our role as educators to teach students this difference and how and when to use both forms. For example, teach students how to read the index page of an information book to find the answer they are looking for. One question I have is… I wonder how I can ensure the books I have available in my future classroom will answer most of the student’s questions about a given research topic.
I do not want to forget about some of the books I came across in this class that I will absolutely bring into my future teaching. The best thing about all of these is that a majority of them are available at the district resource center (SD5). They are as follows:
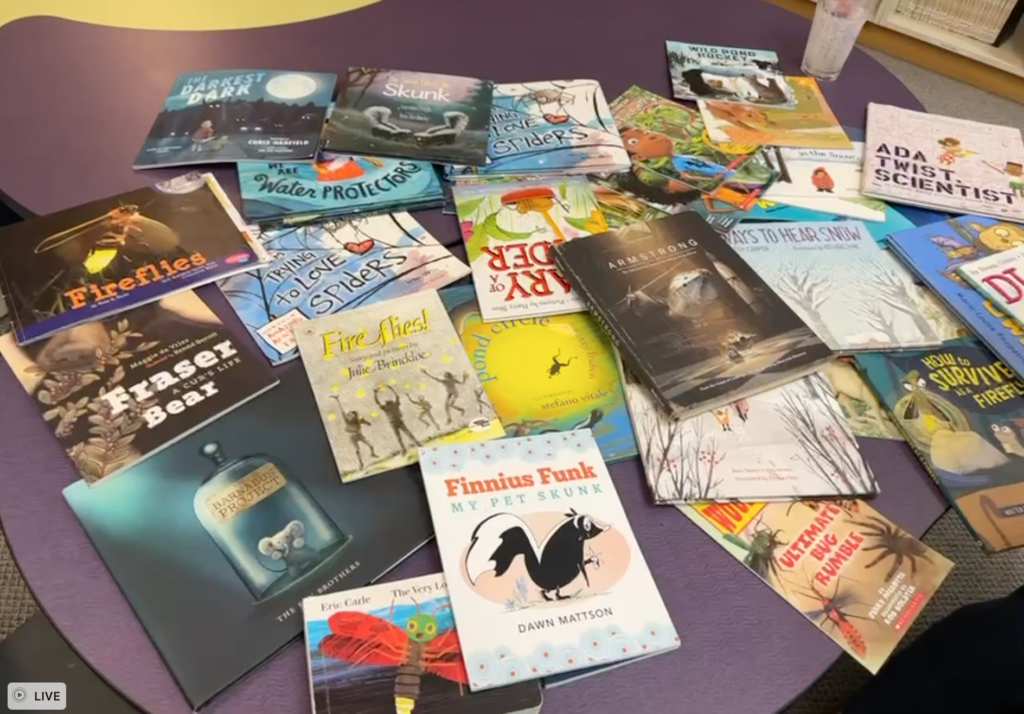
- “Winters Coming” by Jan Thornhill (seasonal changes).
- “Over & Under” by Kate Messner (Animal adaptations and seasonal changes).
- “From Caterpillar to Butterfly” by Deborah Heiligman (Evolution).
- “Grand Canyon” by Jason Chin (information book about earth and climate change).
- “If You Were the Moon” by Laura Purdie Salas (Grade 4 space).
- “If You Find A Rock” by Peggy Christian (Wind, water ice).
- “Another Day in the Milky Way” by David Milgrim (Grade 6).
- “Come on, Rain!” by Karen Hesse (Why water is essential).
- “A Cool Drink of Water” by Barbara Kerley (Different sources of water and how living things use it).
- “The Beaks of Birds” by Richard & Kathleen Konicek-Morgan (Evolution in grade 7) – an activity idea is to have students make their beaks from kitchen supplies. Then have them go around and match their beak with the most appropriate food. Try connecting the bird beaks to local birds.
Now, every time I see a picture book I will look at it with a lens to see if there are any science or cross-curricular connections!
I am going to start planning a lesson this upcoming weekend. I wonder if I can find a book to springboard my lesson from about the human body… I will keep you posted next week!
-Chelsea
Blog Post #5 (February 8th, 2024)
This week we focused on Place Conscious Learning through Environmental Education

My “Aha” moment this week is that prior to this class I never thought of the detrimental, life-long effects of teaching issues related to environmental education on students. In the article: “Beyond Ecophobia: Reclaiming the Heart in Nature Education” by David Sobel, he shares a quote by John Burroughs who cautions that “Knowledge without love will not stick. But if love comes first, knowledge is sure to follow” (Sobel, 1991-2000, p.5). This tied in beautifully with TEK in “Braiding Sweetgrass” in a statement saying: “By honouring the knowledge in the land, and caring for its keepers, we start to become Indigenous to place” (Kimmerer, 2013, p. 210). The reason why the article by David Sobel stood out to me is because I went into this class thinking it is critical that students are not blind to information even if it is hard to hear or see but this is completely wrong and can have lasting effects. From reading this article I have a few other key takeaways for my future teaching practice:
- We must teach emotional empathy between the ages of 3-7 (Sobel, 1991-2000).
- Once students have a foundation of emotional empathy they must continue to learn and show emotional empathy while engaging in exploration between the ages of 7-11 (Sobel, 1991-2000).
- Only when students reach the range of 11-15 can they begin understanding abstract ideas that are not closely intertwined with place (ie. devastation of the rainforest). This would not be possible without first having a deep love and connection through building emotional empathy and exploring place gradually reaching larger areas (Sobel, 1991-2000).
I found this below video on YouTube of David Sobel summarizing his article. I love his statement: “Sustainability has to be approached in a way that is developmentally appropriate” (Sobel, 2008).
One last “aha” I want to share this week is activity suggestions to promote environmental education that I learned to bring into my future teaching:
- Outdoor Scavenger hunt: Give student a sheet of paper with all of the letters of the alphabet. Have them do a “blackout” bingo where the must find an item that starts with each letter from the environment or an adjective to describe the item from the environment for each letter. Once a student or group yells bingo! Gather around and share ideas.
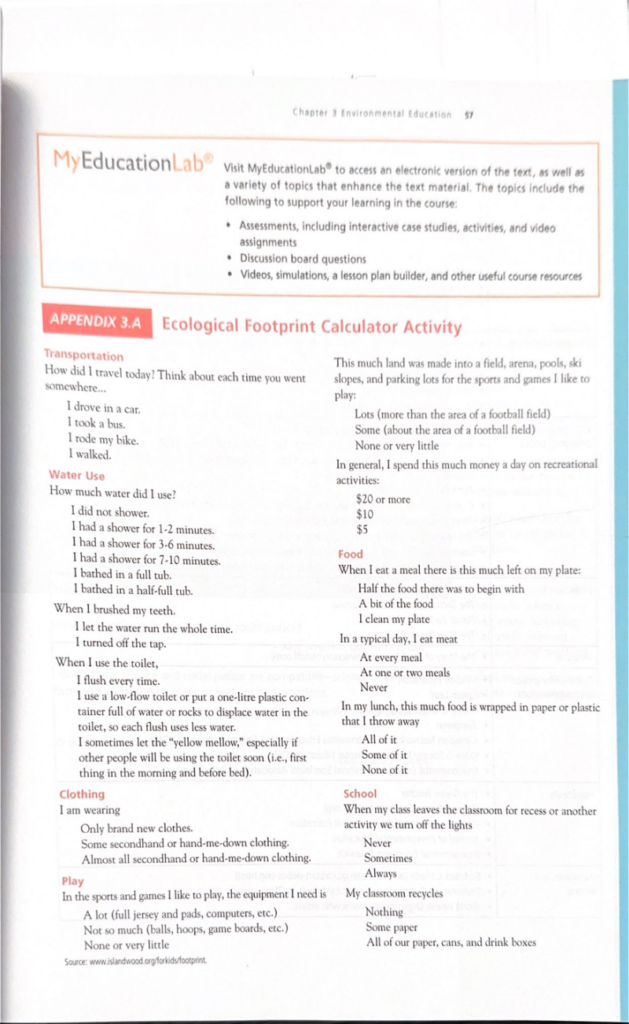
- Teach students about their ecological footprint. Take them outside and complete the “Ecological Footprint Calculator Activity” from the “Explorations in Elementary School Science Text” (Pedretti, Bellomo & Jagger, 2015, p. 57). To adapt this activity to involve movement, ask students to create a circle and for each response advise students how many steps away from the circle it is equivalent to (ie. If you walked no steps, if you rode a bike 1 step, if you took the bus 2 steps, if you drove 3 steps..). Allow students to create ideas of ways they can minimize their ecological footprint form this activity.
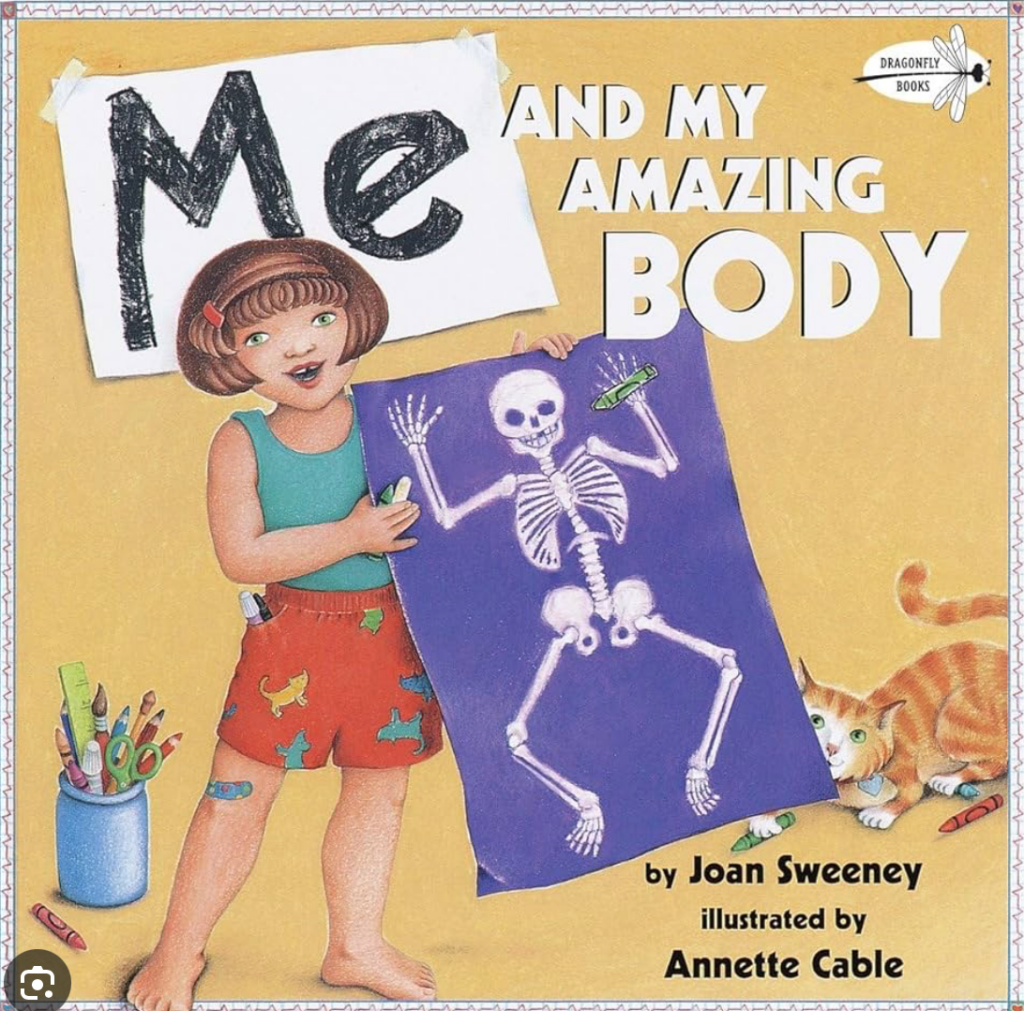
Last week I promised I would share if I found a book to springboard my unit plan from about the Human Body Systems. I did! It is called “Me and My Amazing Body” by Joan Sweeney.
~Chelsea
Blog Post #6 (February 15th, 2024)
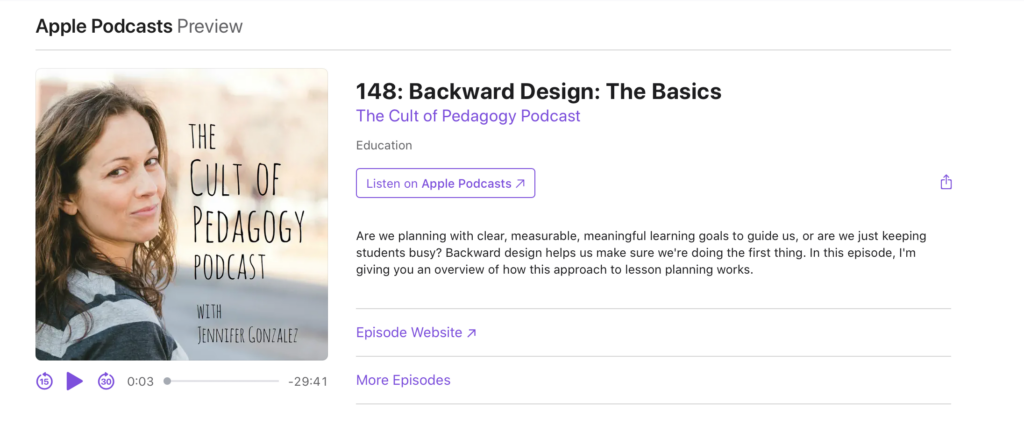
This week we focused on formative and summative assessment strategies for science! My “aha” moment this week was the idea of Backward Design for unit planning. I had heard of this last year; however, I did not give it the time and energy it deserves. I now realize WHY it is so important. As educators, we need to have the end goal in mind so that we plan and create assessments of/as/for learning and a unit that will support students in reaching the learning objectives. Too often we find activities to lead us to a goal when we need to be focusing on the goal and then finding the appropriate strategies to get there. Jennifer Gonzalez shared the basics of this through a podcast called “148: Backward Design: The Basics“ on Apple podcasts.
My key takeaways of how to implement Backward Design:
- Identify what students should know and be able to do by the end of the learning cycle (Gonzalez, 2020).
- Create an assessment to measure that learning (Gonzalez, 2020).
- Plan a sequence of lessons that will prepare students to successfully complete the assessment (Gonzalez, 2020).
I loved the connection that our instructor shared with us during the podcast which was that here in BC we should be starting with the Big Ideas and questions from the BC Curriculum then create an assessment to measure that learning and finally create the lessons to support that learning.
I wanted to look a little further into backward design and by doing this I found a great video by Shelly Moore called “Backwards Design: A great way to move forward!”. I love how she emphasizes that the importance of offering multiple pathways to reach the goal that will work for all students. Please see the below video.
Thinking about backwards design, I have initiated the process of creating my science unit plan. Below is what I have so far:
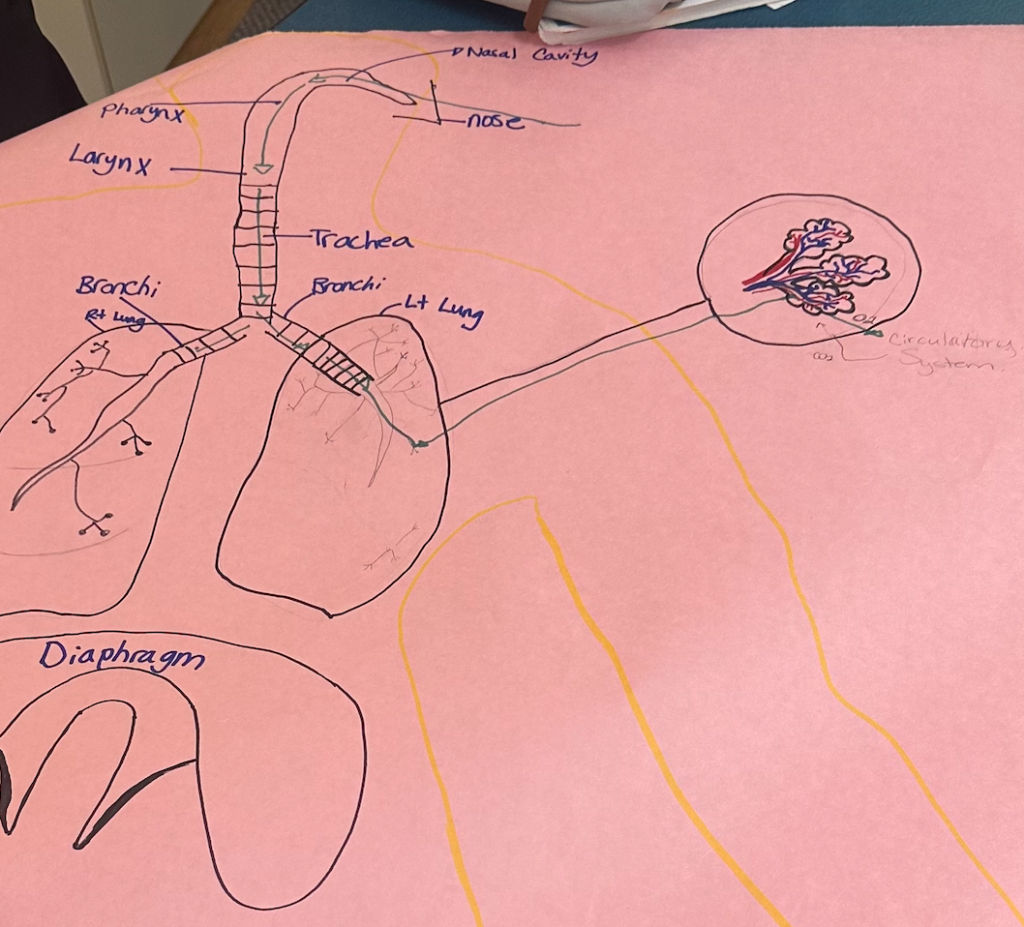
- Starting with the end in mind: The grade 5 science big idea: “Multicellular organisms have organ systems that enable them to survive and interact with their environment” (BC Curriculum, 2024). A question within the Big Idea that I want students to know is “How do organ systems interact with one another?” (BC Curriculum, 2024). Lastly, the content I want them to know is basic structures and functions of the digestive, musculoskeletal, circulatory, and respiratory systems (BC Curriculum, 2024).
- Next, I will work on creating a summative assessment rubric that will have criteria based on the end goal.
- After that I will begin formulating the concept/lesson ideas to guide students there. At the end of the semester I will share my unit plan on this blog to show you what I create with my first time trying a backward design!
See you next week!
~Chelsea
Blog Post #7 (February 22nd, 2024)
My “aha” moment this week was understanding the concept of collateral damage. Robin Wall Kimmerer shares with us the following powerful statement explaining the relation of collateral damage on all living things:
“Collateral damage: shielding words to keep us from naming the consequences of a missile gone astray. The words ask us to turn our faces away, as if man-made destruction were an inescapable fact of nature” (Kimmererer, 2013, p. 349).
Robin takes us through the story of how her and her children would go out at night to save the salamanders that would try to cross the roads at night in the dark to protect themselves from predators (Kimmererer, 2013, p. 350). The reason why this idea of collateral damage stuck out to me was because of the connection we were introduced to of collateral damage within my own area, that of the Western Painted Turtle. I am embarrassed to say that I have never heard of the concern of the diminishing turtle population in the Baynes lake/koocanusa area until today. What I have learned is the huge negative effect of predation and roadways has caused (ie. collateral damage) to the Western Painted Turtle population.
I can’t stop thinking about the following question: are there any animal species in our community that are NOT affected by collateral damage?
I have been really enjoying learning the Traditional Ecological Knowledge perspective within this book so far. It is extremely eye opening. Next week we will be doing a town hall meeting to decide if a Bylaw is needed to mitigate the collateral damage to the Western Painted Turtles in our community. Follow along to find out!
~Chelsea
Blog Post #8 (February 29th, 2024).
This week I was fortunate enough to sit in and listen to my peers act different roles at a mock Townhall meeting about the Western Painted Turtles. I was honestly so amazed at the incredible knowledge that was brought to the table at this meeting and the different perspectives based on their roles. My “aha” moment from this activity was that I could use this in my future teaching practice in multiple subjects. Specifically, I could see this working extremely well in Science, Social Studies, and English Language Arts. Some ideas of how I could incorporate this activity in the future are as follows:
- Science: Plants and animals (ie. wasting disease in deer), the water cycle, water preservation.
- Social Studies: Lack of clean drinking water in our local community, use of cell phones in class, the importance of education seminars regarding the protection of our wetlands ect…
- English Language Arts: Practice using persuasive writing and oral sharing to get students points across at a town hall meeting respectfully.
The reason why using a Townhall Meeting as a strategy stood out to me is that it allows everyone’s voice to be heard, allows students to practice their questioning, hear multiple perspectives on a topic, and apply their learning in a way that connects to the community we are in (make it relevant). Lastly, I think it is important to note what our instructor shared which is that this is best suited for grades 4 and above so that they can bring the required research and writing to be able to participate actively in the discussion.
Thanks for following along! See you next week when we begin creating our stop motion videos!
~Chelsea
Blog Post #9 (March 7th, 2024)
Today was such a blast! I had the opportunity to work with one other UVIC student and two K.O students to begin creating a plan for our stop motion video on landforms! We are creating ours on the landform caves. What was incredible was learning about landforms from our grade 3/4 students. They taught us about stalagmites and stalactites. Stalagmites are the formations on the bottoms of caves and stalactites hang from the top. After the students taught us about what they have been learning in class we supported them in creating a story line for the stop motion video. We brought a sheet of paper with a beginning, middle, and end. The students actively shared their very creative ideas and worked well together to meld their ideas together into one story. We did offer suggestions like being creative while also being realistic as this is one of the requirements on the rubric. They were very receptive to this feedback. We then went on to create a list of props we needed to create. The remainder of the period was spent on building props for the video. The below videos are the items we have created together as a group:


My “aha” takeaways from this class are:
- It is very difficult to find the balance between supporting students creativity and staying within the criteria and especially the time allotted. I felt like we could have worked on the project for a few more hours. One student even said “I really don’t want to stop working on this, can we please keep going?”. In the future I would first explain the time we have to work on it and make a plan with the students right off the bat of how they want to manage their time. The reason why I would do this is because it would teach students time management skills and adequately prepare them to be successful by knowing how much time they have.
- My second aha moment is the beauty that comes with a circular learning cycle. I am excited to share the knowledge I have with students but I am also incredibly excited to learn from my future students. It should never be one-directional. As educators, we are just part of the learning cycle. Sometimes we may be teaching our students and other times they will be teaching us. I am so excited to be a part of this cycle! It makes me think of Traditional Ecological Knowledge. I learned from a citizen of the Ktunaxa Nation that everything is circular, never linear. This shined through today.
I will keep you posted about how our stop motion video turns out next week!
~Chelsea
Blog Post #10 (March 14th, 2024)
Wow! Today in just two hours our group worked hard with the support of Mr. Mackenzie to turn our storyline into a stop motion video! My “aha” moment this week was figuring out how to support creativity while keeping students on a tight timeline. Through this experience I had to learn how to word things in such a way that did not shut my students ideas down while keeping them realistic for the short timeframe we had. For example, when a student said “let’s make some more props for the construction zone!”. I responded with “I really appreciate your idea. I wonder how we could make it realistic with video effects rather than creating props due to our short window of time?”. The students were open to the idea of adding sound effects on the video rather than taking more time to create props. This ensured the students vision still came to fruition even though we did not have time to create the props they had envisioned. The reason why I feel this “aha” moment is so valuable is because I have heard it many times that teachers get overwhelmed with the amount of curriculum they need to cover versus the time they have to teach it. I appreciated this learning experience to give me the opportunity to practice strategies to support students learning process through a time restriction.
I honestly enjoyed my time with my peer (M.T) and the two students we had so very much. I learned so much from each member of the group and Mr Mackenzie about ways to make stop motion videos even better. Below I will add some key points I have taken away from this experience:
- Change the Stop Motion video frames per second setting from 5 to 10.
- Only move an object in the frame one finger width each time.
- Designate roles (mover and one person to run the iPad).
- Prepare the props and outline ahead of time.
- Time sharing the script and if it is over the time frame then cut some things out.
- Take about 10-20 photos between transitions.
- 1 minute takes 600 photos! So be aware of the length with the amount of time the students have (be realistic!).
- Once the students have completed their videos have them upload each one to iMovie for more editing options.
Below is the Stop-Motion video the students in our group created. I am sure proud of what they did in so little time!
Thank you for following along!
~Chelsea
Blog Post #11 (March 28th, 2024)
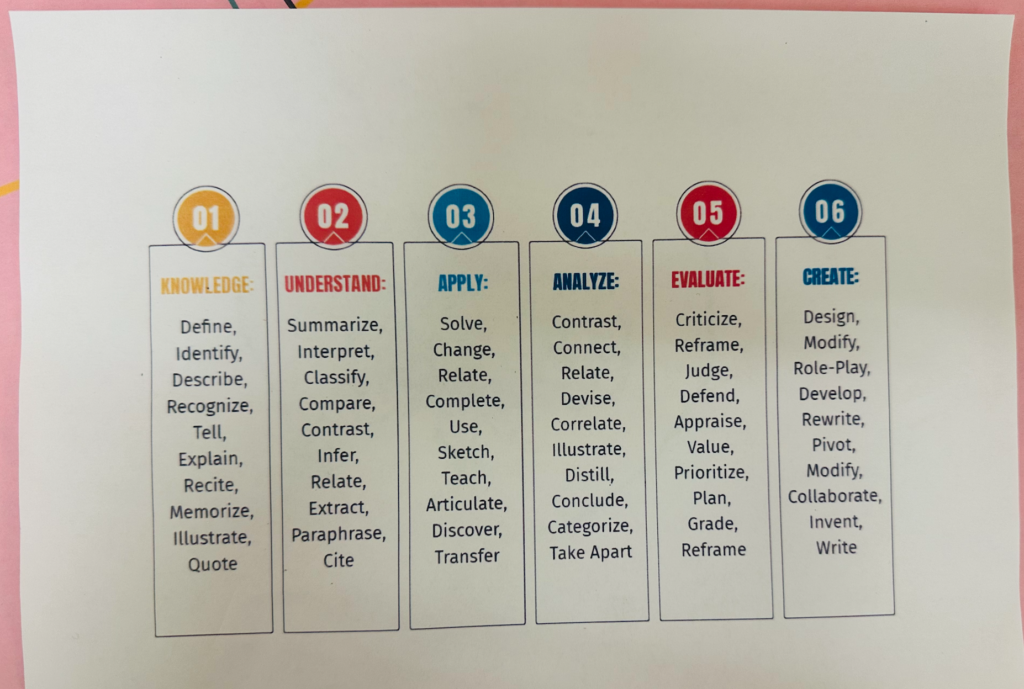
My first “aha” moment this week was that there are higher and lower order thinking tasks (connected to blooms taxonomy). Below is a photo that shows how the different language in questions can help identify if they are lower-order thinking (left) or higher-order thinking (right) questions:
I really appreciated learning this because what it does for me as a teacher is it helps me to differentiate my teaching so it is inclusive of all learners. Providing both lower and higher-order thinking options allows all students to feel welcome and valued as learners where they are at currently. How I plan to implement this in the future is to use the tick-tack-toe method I learned this week as well! See the below photo:
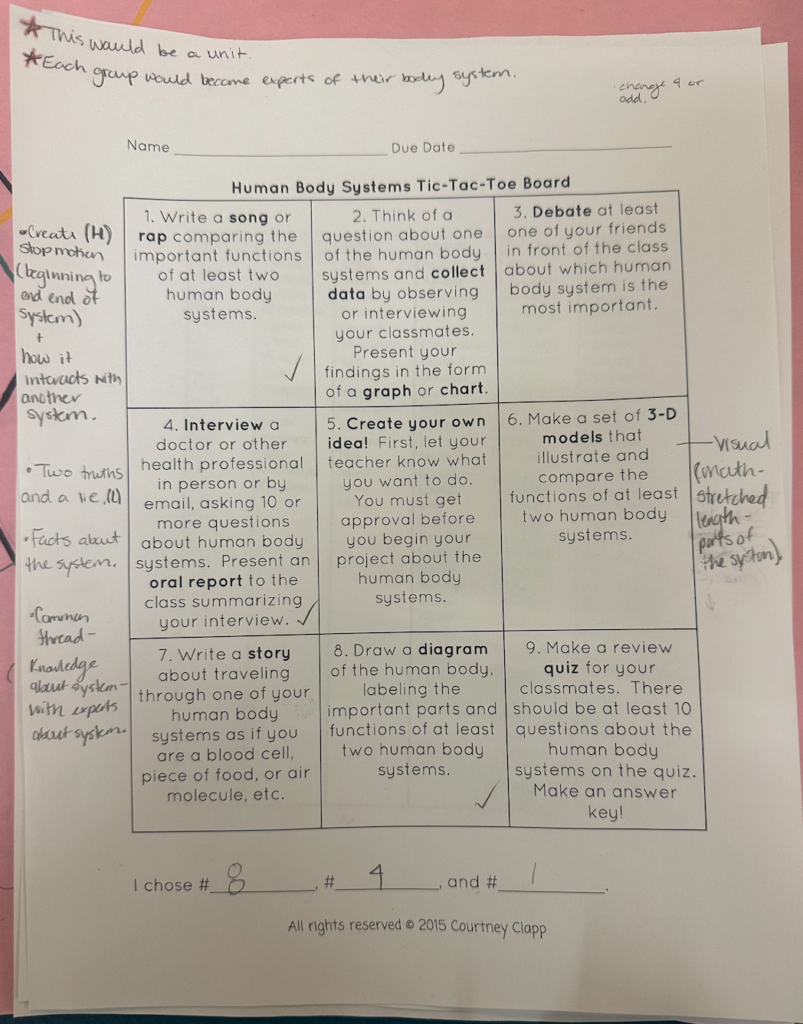
This “Human Body Systems Tic-Tac-Toe Board” is a great example of how to offer lower and higher level thinking questions to differentiate learning and assessment. I actually made my unit plan for this course on the Human Body Systems but in the future, I would adapt my unit plan to adopt this teaching method to make it more inclusive. I love how this method offers students with a choice in their learning which is key to their engagement. I would strategically place the higher and lower order thinking questions so that some students could chose the lower order thinking questions over the higher order-thinking questions; however, I would try to place at least 1 higher order thinking question in each row to push students to try and reach for something that may be out of their comfort zone. Every group of students I teach will be unique so I will adapt my teaching and assessments to work for the current class.
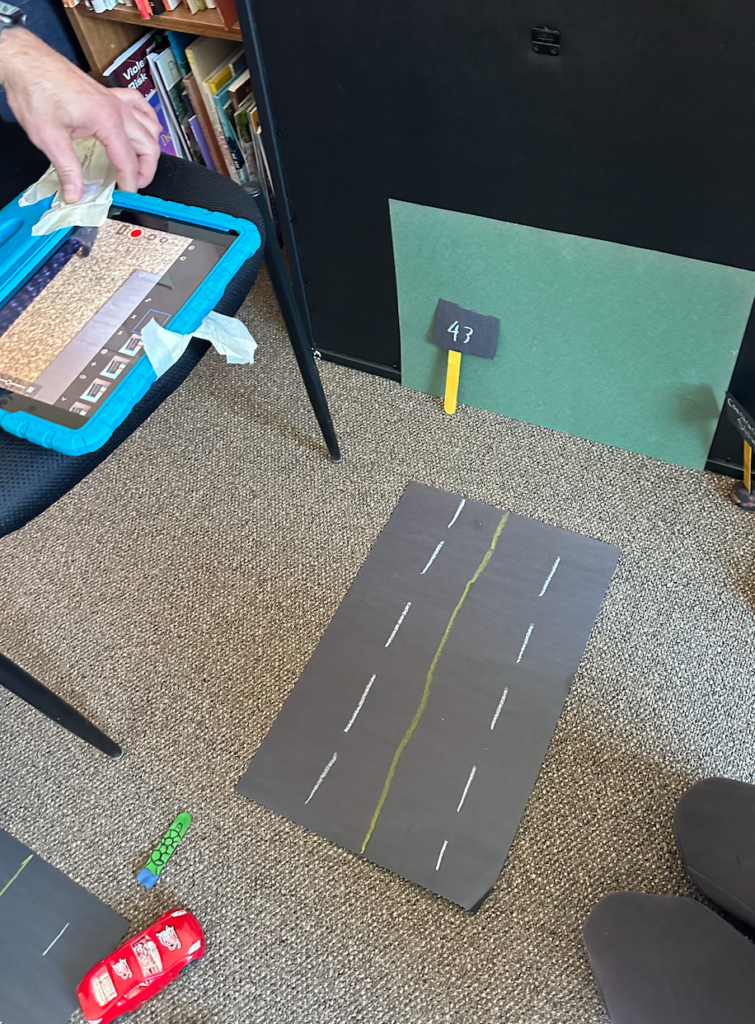
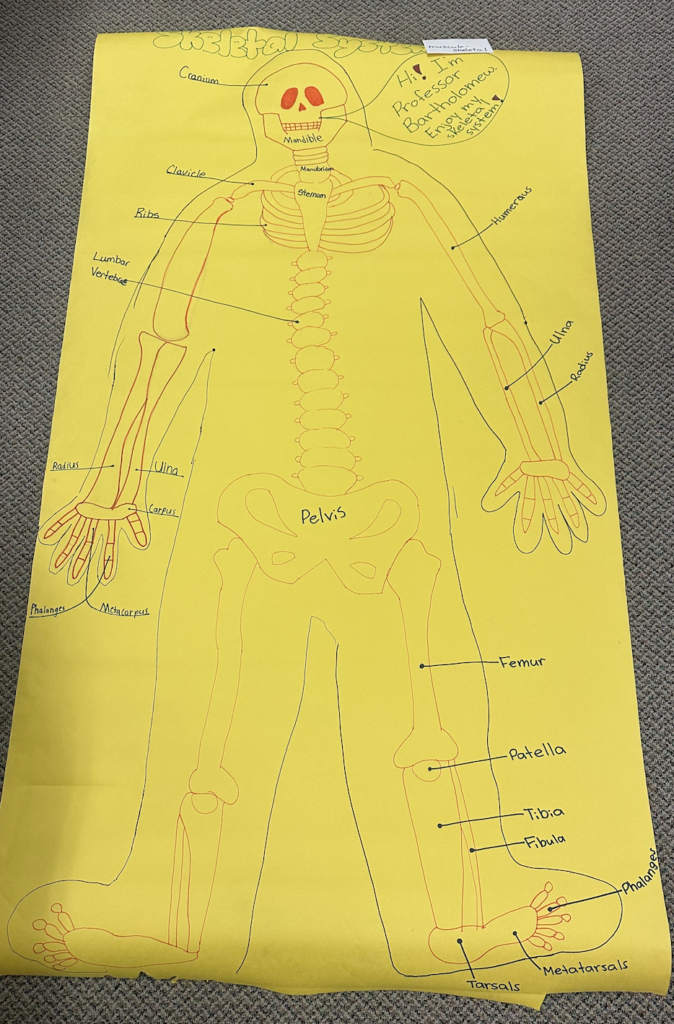
I also have to add how much fun it was today to break off in small groups and make life-sized body systems and share this with the whole class! I think students would feel like “experts” in their body system and really enjoy teaching the rest of their class about it. Below are some photos of the creations from our class! This is a lesson idea I will tuck in my back pocket to use in the future!


Thank you for following along this week!
~Chelsea
Blog Post #12: Unit Plan Development

After creating the first lesson of my unit plan I had an “aha” moment which was understanding the importance of using “how” and “why” questions because they spark inquiry, critical thinking, and divergent thinking (Poole, personal communication, 2024). I took time to reflect on my lesson plan assignment and realized that I missed including these critical questions! I went back and revised my lesson to include “why” and “how” questions. Below is an example of one way I included a “why” question:

In my assessment course this semester I have learned “The person working the hardest is learning the most” (Davies, 2020, p. 83). This is why I think it is imperative to ask divergent questions through how and why. It requires the student to think beyond yes and no responses and delve deeper into the content rather than covering the surface.
Using why and how questions is something that I now try my best to include in all of my unit planning across the different subjects. I truly feel that it has adapted my philosophy as an educator for the better and will benefit my students down the road to be critical thinkers.
Thank you so much for following along my wonder journal! I hope you have found parts of it to be useful in your practice. I will use this platform to refer to my thoughts over my career so that I never forget the important “aha” moments that will allow me to be the best teacher I can be!
~Chelsea
References (For the entire science blog)
Curriculum. (n.d.-a). https://curriculum.gov.bc.ca/
Davies, A. (2020). Making classroom assessment work. Davies Duncan Holdings Inc.
District Resource Center – District Resource Center. (n.d.). https://www.sd5.bc.ca/resources/drc/Pages/default.aspx#/=
FirstVoices.com. FirstVoices. (2024). https://www.firstvoices.com/
Gonzalez, J. (2023, November 28). Backward design: The basics. Cult of Pedagogy. https://www.cultofpedagogy.com/backward-design-basics/
Gonzalez, J. (2020, June 21). The Cult of Pedagogy Podcast: 148: Backward design: The basics on apple podcasts. Apple Podcasts. https://podcasts.apple.com/ca/podcast/148-backward-design-the-basics/id900015782?i=1000479007189
Google. (n.d.-a). Google Images. https://images.google.com/
Kimmer, R. W. (2013). Braiding Sweetgrass. Milkweed Editions.
Mcdaniel, R. (1970, June 10). Bloom’s taxonomy. Vanderbilt University. https://cft.vanderbilt.edu/guides-sub-pages/blooms-taxonomy/
Moore, S. (2019, April 1). Backwards design: A great way to move forward!. YouTube. https://www.youtube.com/watch?v=mLKHaNo98Ts
Pedretti, E., Bellomo, K., & Jagger, S. (2015). Explorations in elementary school science: Practice and theory, K-8. Pearson.
Poole, J. (2024). Personal Communication
POULSEN, Z. C. (2020, August 26). An introduction to plant taxonomy: The science of names. The Botanical Society of South Africa. https://botanicalsociety.org.za/the-science-of-names-an-introduction-to-plant-taxonomy/#:~:text=Plant%20taxonomy%20is%20the%20science,are%20related%20to%20each%20other.
Sobel, D. (2008, October 23). Educating for sustainability- David Sobel. YouTube. https://www.youtube.com/watch?v=gS6Ut17vMjc
Sobel, D. (1991-2000). Home. Kindernature. https://kindernature.org/
Svoboda, N. (2020, September 5). Photo by Nyusha Svoboda on unsplash. Pink flowers in tilt shift lens photo – Free Yekaterinburg Image on Unsplash. https://unsplash.com/photos/pink-flowers-in-tilt-shift-lens-up9m6sc96M0
Wilson, T. (2021, August 15). Photo by Tim Wilson on unsplash. Person holding clear glass ball photo – Free Oh Image on Unsplash. https://unsplash.com/photos/person-holding-clear-glass-ball-4gq56qQTCJA